 |
| Hi, I’m a little snake and I will teach you about Virtual Environments in Anaconda :D |
Python can be a very dirty place to work in, if you put all of your packages for every project in one place. Installing one package on top of another and breaking the other packages due to dependencies can be very frustrating. It can also break your python or Anaconda installation.
In this article I will show you how to work cleanly with no danger of ever breaking your Anaconda installation or dependencies, using Anaconda’s virtual environments. You will be able to see all commands in the console pictures, in case you are in a hurry.
What is a virtual environment?
A virtual environment is a place that is separated from your main installation of Anaconda. You could think of it as a clone of your base installation, that you can beat, break, set ablaze and then throw in a pond of piranhas.
Well, I may have exaggerated a bit, but you get the idea. You wouldn’t want to do all of that to your base installation, as it can break multiple things.
I remember the first time I started Machine learning with Anaconda and didn’t have any idea that virtual environments existed. I broke my Anaconda installation multiple times, of which 4 times I had to reinstall my Windows distribution. Finding out about virtual environments saved me a lot of keyboards, to say the least.
Creating an Environment
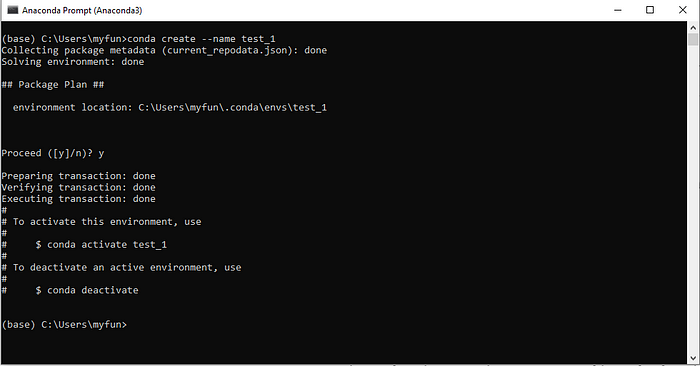
Creating an environment is pretty easy and it can be done in a few ways:
For a short and fast environment creation, simply use the following command:
For creating the environment with a specific Python version use the following:
For creating an environment with a base package of a specific version use the following:
You can also combine the previous 2 commands, which will become the following:
If you are working with friends, or you plan on creating tutorials for others, you can also export or import your Anaconda environments with all of the packages you installed. Of course, you can use this to also move the environment from one of your PCs to another PC, if you are a lonely no-lifer and have no friends… But I would highly recommend getting some friends in your life, as it makes everything, including coding, better :).
Firstly, activate your environment using:
conda create -n testEnv -y
For creating the environment with a specific Python version use the following:
conda create -n testEnv36 python=3.6
For creating an environment with a base package of a specific version use the following:
conda create -n envScipy015 scipy=1.6.0
You can also combine the previous 2 commands, which will become the following:
conda create -n env36Scipy015 python=3.6 scipy=1.6.0
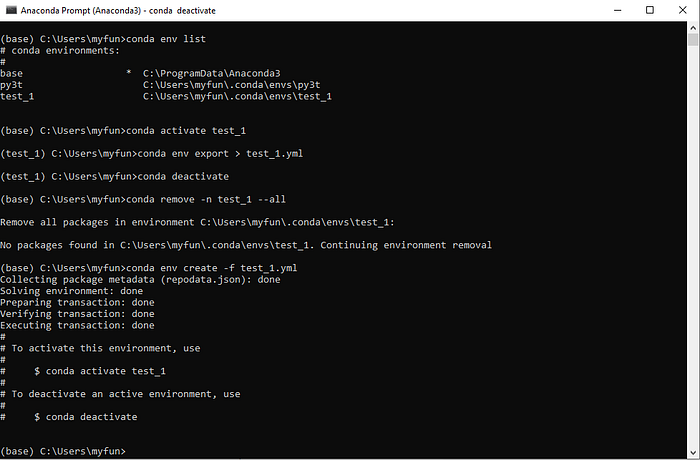
If you want to see the environments you just created, write in your console: conda env list
If you want to activate the environment you just created you can just write: conda activate test1
Also, if you want to clone an environment with all its packages, you can use the following command: conda create --name testEnvClone --clone testEnv
I recommend cloning environments when you have something working for a current project with no trouble, and you want to add new packages that may break some of your other packages if installed. This way you can have a backup (in this case testEnv) and you can test all your new installations and how they work on your clone (in this case testEnvClone).
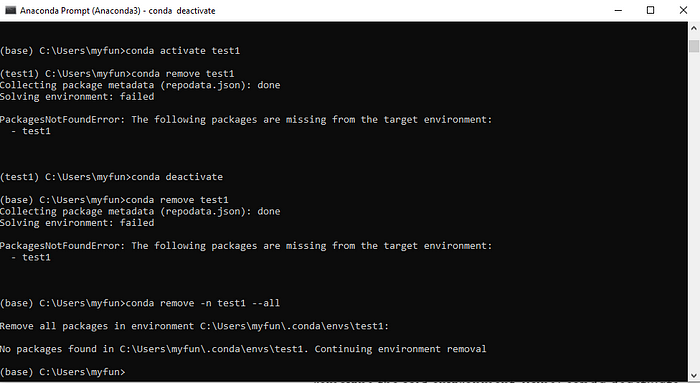
If you break it you bought it! Just kidding — remove an environment by using the following command: conda remove -n envName --all
Remember to use the command to deactivate your environment before removing the said environment, using: conda deactivate
If you want to see the environments you just created, write in your console: conda env list
If you want to activate the environment you just created you can just write: conda activate test1
Also, if you want to clone an environment with all its packages, you can use the following command: conda create --name testEnvClone --clone testEnv
I recommend cloning environments when you have something working for a current project with no trouble, and you want to add new packages that may break some of your other packages if installed. This way you can have a backup (in this case testEnv) and you can test all your new installations and how they work on your clone (in this case testEnvClone).
Activate, deactivate, remove
After the environment is activated, you can behave as you would usually. Install any package you like, as many as you like. Test how different packages work together — if they do work together.If you break it you bought it! Just kidding — remove an environment by using the following command: conda remove -n envName --all
Remember to use the command to deactivate your environment before removing the said environment, using: conda deactivate
 |
| import/export |
Exporting potatoes, importing tomatoes
If you are working with friends, or you plan on creating tutorials for others, you can also export or import your Anaconda environments with all of the packages you installed. Of course, you can use this to also move the environment from one of your PCs to another PC, if you are a lonely no-lifer and have no friends… But I would highly recommend getting some friends in your life, as it makes everything, including coding, better :).
Firstly, activate your environment using:
conda activate envName
Secondly, export your environment as a file using:
Secondly, export your environment as a file using:
conda env export > envName.yml
The file will be saved in C:\users\YourUserName
To create an environment on another computer you need to first make sure there is no other environment that has the same name as the environment you exported. By that name, I mean the environment name, not the .yml file name.
You can then create a new environment from the .yml file using:
conda env create -f envName.yml
Make sure the .yml file is placed in C:\users\YourUserName before attempting this. This path may be different if you changed any settings — this is just my default.
Hope I helped a bit by curing some of the headaches and money wasted on new keyboards, with my article. I surely wished this was the first thing I learned when I first started my Anaconda machine-learning journey. But as we live, we learn. And I believe it’s our duty to make things easier for others in the future if we can.
I wish you all happy learning!
Make sure the .yml file is placed in C:\users\YourUserName before attempting this. This path may be different if you changed any settings — this is just my default.
In the end, it does matter
Hope I helped a bit by curing some of the headaches and money wasted on new keyboards, with my article. I surely wished this was the first thing I learned when I first started my Anaconda machine-learning journey. But as we live, we learn. And I believe it’s our duty to make things easier for others in the future if we can.
I wish you all happy learning!
Comments
Post a Comment